Introduction
In today’s fast-paced development landscape, deploying applications efficiently and ensuring scalability are paramount. Dockerizing Spring Boot applications has emerged as a popular solution to address these challenges. This blog post will explore the benefits of dockerizing Spring Boot apps and provide a step-by-step guide to containerize your projects.
What is Docker?
Docker is an open-source platform that allows you to develop, ship, and run applications inside containers. Containers are lightweight, isolated environments that package all the dependencies needed to run an application, making it consistent across various environments.
How Docker Was Born

Docker was born out of the need to solve the problem of deploying and managing applications in a consistent and repeatable manner.
In the early days of cloud computing, applications were often deployed as virtual machines (VMs). VMs are great for isolating applications from each other, but they can be difficult to manage. They also require a lot of resources, which can be expensive.
Docker solves these problems by using containers. Containers are lightweight, self-contained units that contain everything an application needs to run, including the application’s code, libraries, and runtime environment. This makes containers easy to deploy and manage, and they also use fewer resources than VMs.
Docker was created by Solomon Hykes in 2013. Hykes was working on a platform-as-a-service (PaaS) company called dotCloud, and he was frustrated with the way that applications were being deployed and managed. He decided to create a new technology that would make it easier to deploy and manage applications.
Hykes started working on Docker in his spare time, and he released the first version of Docker in 2013. Docker quickly gained popularity, and it is now one of the most popular containerization platforms in the world.
Advantages of Dockerizing Spring Boot Applications
Dockerizing a Spring Boot application offers several compelling advantages, making it a popular choice among developers and DevOps teams. Here are some of the key reasons why you might want to Dockerize your Spring Boot application:
-
Portability: Docker containers encapsulate your Spring Boot application and all its dependencies, libraries, and configurations. This ensures your application runs consistently across different environments, from development to testing and production. With Docker, you can avoid the “it works on my machine” problem and ensure seamless deployment on any platform that supports Docker.
-
Consistency: Dockerizing your Spring Boot application ensures that the environment in which it runs is identical throughout the entire development and deployment lifecycle. This consistency reduces the likelihood of environment-related issues and streamlines the testing and debugging process.
-
Isolation: Docker containers provide isolation for your Spring Boot application from the host system and other containers. This isolation enhances security and stability, as each container operates independently without interfering with others.
-
Scalability: Docker makes it easy to scale your Spring Boot application horizontally by spinning up multiple containers. With container orchestration platforms like Kubernetes, you can dynamically adjust the number of instances based on demand, ensuring optimal performance during peak usage.
-
Resource Efficiency: Compared to traditional virtual machines, Docker containers are lightweight and share the host OS kernel. This means they consume fewer resources and start up much faster, enabling rapid scaling and reducing infrastructure costs.
-
Version Control and Rollback: Docker images are version-controlled, allowing you to tag and manage different versions of your Spring Boot application. If an issue arises, you can easily rollback to a previous version by running the corresponding Docker image.
-
Continuous Integration and Continuous Deployment (CI/CD): Dockerized applications fit seamlessly into modern CI/CD pipelines. With Docker, you can automate the building, testing, and deployment process, making it easier to deliver new features and updates to your application.
-
Ecosystem and Tooling: Docker has a vibrant ecosystem with a wide range of tools and services that complement containerized applications. For instance, you can use Docker Compose for local development and testing and Kubernetes for managing container orchestration in production.
-
Collaboration: Docker images serve as a common artifact for collaboration between developers, testers, and operations teams. They help establish a shared environment, making it easier to reproduce bugs and share improvements.
How NOT To Dockerize Spring Book Applications ❌
If you do a search on YouTube, and Google, on how to “dockerize spring boot application”, you will see that most of the Video tutorials and blog posts have their Dockerfile containing this kind of code
FROM amazoncorretto:21-alpine
ARG JAR_FILE=target/*.jar
COPY ${JAR_FILE} app.jar
EXPOSE 80
ENTRYPOINT ["java","-jar","app.jar"]
This approach is straightforward and suitable if you have already built the JAR file outside the Docker build process and want to package it into the image. The major problem with this approach is the build process is not reproducible.
The right approach, which you will see shortly, is a more comprehensive approach that allows you to perform the complete build process inside the Docker image, ensuring that the build environment is consistent.
How To Dockerize Spring Boot Applications ✅
- Change
targetCompatibilityandtargetCompatibilityto Java v21
+ sourceCompatibility = '21'
+ targetCompatibility = '21'
- Create a file and save it as
.env.prodin the root directory of your project, and add the environmental variables as shown below
export APP_PORT=80
export APP_ADDRESS=0.0.0.0
In the context of Dockerizing a Spring Boot application, the provided commands set environment variables inside the container. Let’s break down each line:
-
export APP_PORT=80: This command sets the environment variableAPP_PORTto the value80.APP_PORTrepresents the port number on which the Spring Boot application will listen for incoming network requests.Port 80 is commonly used for HTTP traffic, so setting
APP_PORTto 80 means the application will listen for incoming HTTP requests inside the container. -
export APP_ADDRESS=0.0.0.0: This command sets the environment variableAPP_ADDRESSto the value0.0.0.0.0.0.0.0is a special IP address that represents “any available network interface” in networking terminology. In the context of Docker, settingAPP_ADDRESSto0.0.0.0means that the Spring Boot application inside the container will listen for incoming network connections from any available network interface inside the container.The use of
0.0.0.0as the address inside the container means the application will be accessible to any client that can reach the container’s network interface, regardless of the client’s IP address. This is often used when you want the application inside the container to be reachable from outside the container, and you do not want to bind the application to a specific IP address inside the container.
- Create a Docker file and save it as
Dockerfilein the root directory of your project
Gradle
# Build stage
FROM gradle:8.3-jdk AS build
LABEL maintainer="codaholic.com"
WORKDIR /
COPY . /
RUN gradle clean bootJar

# Package stage
FROM amazoncorretto:21-alpine
COPY --from=build /target/libs/*.jar app.jar
EXPOSE 80
ENTRYPOINT ["java","-jar","app.jar"]
Maven
# Build stage
FROM maven:3.9.5-eclipse-temurin-21-alpine AS build
LABEL maintainer="codaholic.com"
WORKDIR /
COPY . /
RUN mvn clean package

# Package stage
FROM amazoncorretto:21-alpine
COPY --from=build /target/*.jar app.jar
EXPOSE 80
ENTRYPOINT ["java","-jar","app.jar"]
This Dockerfile is what we’ll use to build a multi-stage Docker image for our Spring Boot application. Let’s explain each part of this Dockerfile:
-
FROM gradle:8.3-jdk AS build or FROM maven:3.9.5-eclipse-temurin-21-alpine AS build: This sets the base image for the build stage. It uses an official Gradle or Maven image with JDK 21. The alias “build” is given to this stage, allowing us to refer to it later in the file. -
LABEL maintainer="codaholic.com": This adds a label to the image, specifying the maintainer or creator of the image. -
WORKDIR /: This sets the working directory inside the container to the root. -
COPY . /: This copies the entire content of the current directory (where the Dockerfile is located) into the root directory of the container. This includes the source code and build files needed for the build process. -
RUN gradle clean bootJar or mvn clean package: This executes the Gradle or Maven build process inside the container. It runs thecleanandbootJar or packagetasks to clean the project and create an executable Spring Boot JAR file. -
FROM amazoncorretto:21-alpine: This sets the base image for the final stage. It uses the Amazon Corretto image with Alpine Linux. -
COPY --from=build /target/libs/*.jar app.jar or COPY --from=build /target/*.jar app.jar: This copies the generated Spring Boot JAR file (*.jar) from the build stage to the root directory of the final stage and renames it toapp.jar. -
EXPOSE 80: This indicates that the container will listen on port 80 when running, though this does not actually publish the port to the host machine. -
ENTRYPOINT ["java","-jar","app.jar"]: This specifies the command that will be executed when the container starts. It runs the Spring Boot application using thejava -jarcommand and passesapp.jaras the JAR file to be executed.
The Dockerfile uses multi-stage builds to separate the build process from the final image, reducing the image size and avoiding including unnecessary build tools in the final image. The first stage uses Gradle to build the Spring Boot application, and the second stage uses the resulting executable JAR file to create the final image.
- Create a file and save it as
docker-compose.ymlin the root directory of your project.
version: "3.9"

services:
  app:
    build: ./
    ports:
      - 3000:80
    restart: on-failure
    env_file: ./.env
    tty: true
The provided code snippet is a Docker Compose file written in version 3.9 syntax. It defines a single service named “app” for a Docker container. Let’s break down the configuration:
-
version: "3.9": Specifies the version of the Docker Compose file format being used. -
services: The starting point for defining services (containers) to be run. -
app: The name of the service, which can be customized as needed. -
build: ./: Indicates that the Docker image for this service will be built using the Dockerfile located in the current directory (./). -
ports: This section maps the ports between the host and the container. The format is HOST_PORT:CONTAINER_PORT. In this case, it maps port 3000 on the host to port 80 inside the container. This means that any traffic coming to port 3000 on the Docker host will be forwarded to port 80 inside the “app” container. -
restart: on-failure: Specifies that the container should automatically restart if it fails. In this case, the container will restart only if the application running inside it fails. -
env_file: ./.env: Specifies the path to the.envfile, which will provide environment variables to the container. The.envfile can contain key-value pairs of environment variables, and these variables will be available to the application running in the container. -
tty: true: Allocates a pseudo-TTY for the container, allowing interactive terminal communication. This is useful for running applications that may require interactive input or displaying information on the terminal.
- Open up the terminal if you are a Mac user or the command prompt (cmd) if you are a PC user and type in this.
docker-compose up -d
Since you’re doing this for the first time, it will take a while, depending on the size of your application. When it is done you should see something like this below.
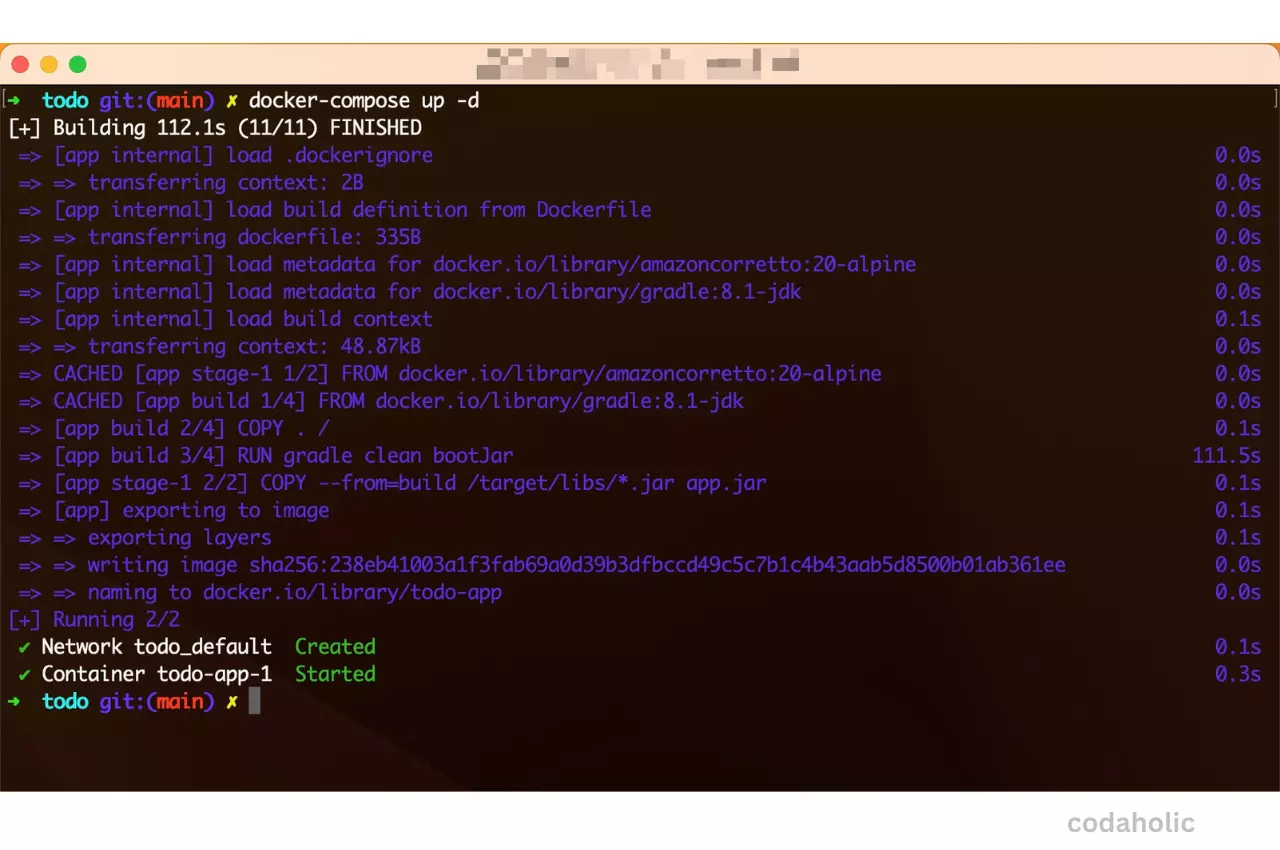
Congratulations, we have dockerized and ensured that our Spring Boot Web API is working as intended.
The source code for this blog post is hosted on codaholic
Bonus: Best Practices and Tips for Dockerizing Spring Boot
- Use a minimal base image to reduce image size and improve performance.
- Leverage multi-stage builds to separate build dependencies from the final image.
- Use environment variables to configure your Spring Boot application within the container.
- Ensure that your application’s configuration files are appropriately mapped into the container.
- Regularly update your Docker images and base images to maintain security and stability.

Frequently Asked Questions
How do I create a Docker image for my application?
To create your own Docker image for your application, follow these steps:
- Write a Dockerfile for your application. This file contains the instructions for building your image, including the base image, dependencies, and any necessary configurations.
- Use the
docker buildcommand to build your image from the Dockerfile. This will create a new image based on the instructions in your Dockerfile. - Host your Docker image on a registry, such as Docker Hub or a private registry. This allows you to easily share your image with others and manage versions of your image.
- Pull the image from the registry and run it on the target machine. This can be done using the
docker pullcommand to retrieve the image from the registry, and thedocker runcommand to run the image on the target machine.
What is the best practice for Dockerize Spring Boot application?
In essence, adding a .dockerignore file into your Dockerization process for a Spring Boot application is a wise decision. By doing so, you can effectively minimize the size of the build context, accelerate the build process, and bolster the security of your Docker image.
How to check the Java version in a Docker container?
The base image tag typically indicates the version of the container’s operating system. Another method is to use the docker exec command to run a command inside a running container, similar to remotely accessing a different subsystem on your host operating system. The docker exec command allows you to execute a command inside a running container as if you were interacting with it directly, even if it’s running on a different machine.