What is Maven
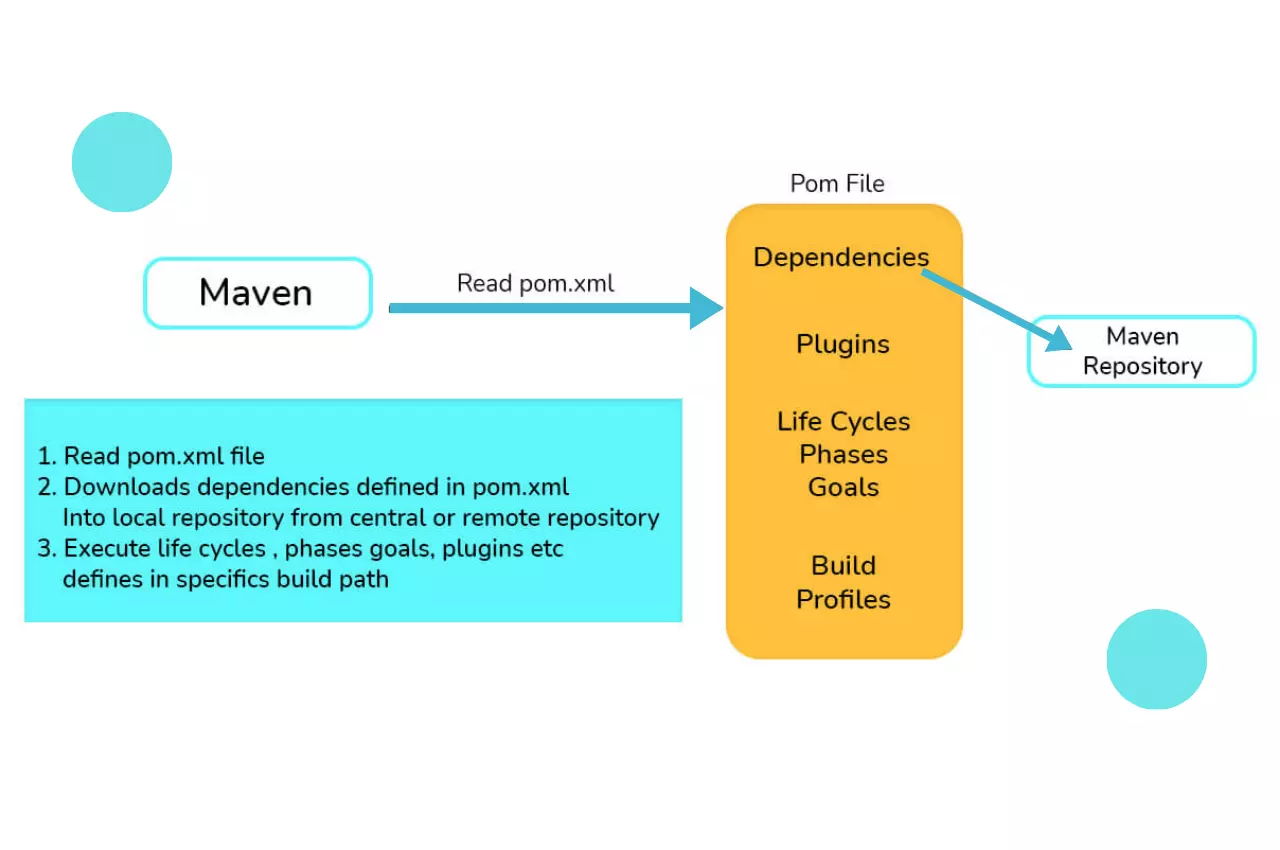
Maven, often dubbed as the “swiss army knife” of Java development, is a robust and highly popular build automation and project management tool. It plays a pivotal role in simplifying the often intricate and multifaceted process of building, managing, and delivering Java-based software projects. Maven is renowned for its ability to bring order and efficiency to the entire software development lifecycle, from project initialization to build automation, testing, reporting, and the seamless management of project dependencies.
What sets Maven apart is its emphasis on convention over configuration, which means that it streamlines project development by adhering to a set of best practices and predefined project structures. This approach relieves developers from the burden of manual, error-prone project configurations, allowing them to concentrate on coding and delivering exceptional software. With its extensive ecosystem of plugins and a central repository for project dependencies, Maven simplifies the complexities of managing external libraries and resources, enhancing both developer productivity and project reliability.
Characteristics of Maven

Below are the characteristics make Maven a robust and indispensable tool in the realm of Java development.
-
Dependency Management: Maven shines in managing project dependencies efficiently. It automatically downloads and maintains external libraries, making sure your project always uses the right versions.
-
Convention over Configuration: Maven follows a “convention over configuration” philosophy, which simplifies the setup. Developers don’t need to spend time configuring the build; Maven provides sensible defaults.
-
Centralized Repository: Maven Central is the go-to repository for Java libraries and artifacts. This vast resource streamlines the inclusion of external code into your projects.
-
Plugin Ecosystem: Maven boasts a rich ecosystem of plugins. These extensions allow you to tailor the build process, integrate with various tools, and perform custom tasks without reinventing the wheel.
-
Build Lifecycle: Maven provides a well-defined build lifecycle. It’s a series of phases like compile, test, package, install, etc. This approach ensures consistency and reliability across different projects.
-
Consistent Project Structure: Maven enforces a consistent project structure. This consistency aids in project navigation and helps developers quickly understand where different files and resources are located.
-
Extensive Reporting: The tool generates detailed reports about the build process, test results, and more. This reporting mechanism aids in identifying and resolving issues promptly.
-
Multi-Module Projects: For complex systems, Maven supports multi-module projects, allowing you to manage multiple interconnected projects together.
-
Transitive Dependency Resolution: Maven handles transitive dependencies adeptly. If your project depends on library A, which in turn depends on library B, Maven ensures you get both A and B without manual intervention.
-
Cross-Platform: Maven is platform-independent, so it works on various operating systems, making it accessible to a broad spectrum of developers.
Downsides to Maven

Maven exhibits a notable drawback: the issue of a delayed start. This delay can be attributed to several factors:
-
Project Complexity: In projects laden with numerous dependencies, the build process can elongate. Maven meticulously resolves and constructs each module and its associated dependencies, consuming valuable time.
-
Internet Connection Speed: Dependency retrieval from remote repositories is pivotal in the build process. With a sluggish internet connection, build times can considerably extend.
-
Outdated Dependencies: Maven expends additional time when dealing with obsolete dependencies. Ensuring your dependencies are up to date can help mitigate this delay.
-
Plugin Configuration: Ineffectively configured plugins have the potential to detrimentally affect build performance. Prudent plugin setup is imperative.
-
Maven Central Repository: Any downtime experienced by the Maven Central Repository can disrupt the download of dependencies, further impeding the build duration.
-
Test Suite Size: Extensive test suites, whether unit or integration tests, introduce notable overhead to the build process. A large number of tests results in a prolonged build duration.
-
Clean Builds vs. Incremental Builds: It’s essential to distinguish between clean builds (achieved with mvn clean install) and incremental builds (executed with mvn install). Clean builds, which necessitate the deletion of existing build artifacts and a fresh start, are inherently lengthier. Incremental builds, on the other hand, are more efficient and faster.
Tips On How to Improve Maven Build Performance

Accelerating your Maven build not only enhances our development efficiency but also saves us invaluable time. Here, we’ll delve into practical suggestions and best practices to optimize your Maven builds:
- Enable Multiple Threads for Parallel Builds
Maven, from version 3.0 onwards, empowers us with the capability of parallel builds. By specifying the number of threads, Maven orchestrates the concurrent construction of modules, turbocharging your build process. To harness this feature, you simply set the –threads flag when initiating Maven.
You have the flexibility to explicitly define the exact number of threads for your project’s build, as illustrated below:
mvn clean install -T 4
In this example, Maven is set to utilize 4 threads for the build, igniting the build speed.
Alternatively, you can tailor the thread count according to the number of available CPUs on your machine, as demonstrated here:
mvn clean install -T 1C
The above command customizes the thread count, allocating 1 thread for each available CPU core. This approach harnesses your machine’s processing potential, fostering an efficient build process with a human touch.
- Build Only What is Needed
When working on a substantial project, it’s smart to adopt an incremental build strategy. This approach focuses on recompiling only the parts that changed and their related components, slashing development time.
Here’s how you do it:
mvn clean install -pl module_1, module_2 -am
-pl - Maven will build only the specified modules and not the whole project.
-am - Maven will figure out what modules out target depends on and build them too.
- Use Maven’s Offline Mode
Maven offers a handy offline mode that comes in handy if you’re working on a project with stable dependencies and don’t need to fetch updates from remote repositories every time you build.
To activate this mode, run the following straightforward command:
mvn clean install -o
However, exercise caution when employing this command, as it prevents Maven from fetching the latest updates from remote sources.
- Skip Tests to Speed Up Builds
When you’re in the development zone, you can give your build process a boost by temporarily skipping tests. This is super handy, especially when you’re making lots of quick changes.
To put this into action in your Maven projects, you’ve got two options:
- Skip Test Execution:
mvn clean install -DskipTests
- Skip Test Compilation and Execution:
mvn clean install -Dmaven.test.skip=true
By using either of these commands, you can fast-track your build without running tests – a simple way to save time during development.
- Fine-Tuning JVM for Faster Builds
To accelerate your builds, you can tweak the JVM settings, which can seem a bit technical but can be simplified. The JIT (Just-In-Time) compiler plays a pivotal role here, optimizing code compilation based on specific thresholds. We can get our hands dirty by trying out settings like -XX:CompileThreshold to find the sweet spot that works best for our project.
Additionally, the JVM (Java Virtual Machine) supports tiered compilation. You can enable this with the -XX:+TieredCompilation flag. It’s like switching on a turbo boost for the startup time, resulting in an overall performance boost for your build process.
To make things even simpler, you can set JVM parameters instructing it to focus on essential JIT compilation. Just include this line in your project:
export MAVEN_OPTS="-XX:+TieredCompilation -XX:TieredStopAtLevel=1"
- Enable Test Forking
When it comes to software development, speed and efficiency are key. One aspect where you can significantly enhance the efficiency of your Maven builds is by allowing your tests to run in a separate Maven process. This practice, known as “test forking,” can be a game-changer. Let’s explore how to set it up in your Maven settings:
<properties>
<maven.test.fork>true</maven.test.fork>
<surefire.forkMode>once</surefire.forkMode>
</properties>
Here’s what’s happening:
<maven.test.fork>true</maven.test.fork>:
Maven provides a property called maven.test.fork. When set to true, it instructs Maven to run your tests in a separate Java process. This separation is crucial because it ensures that tests are independent of each other and don’t interfere with the main Maven build process or with other tests. This property adds a layer of isolation.
<surefire.forkMode>once</surefire.forkMode>:
Within Maven, there’s a plugin called Surefire, which is responsible for executing tests. You can specify the fork mode for Surefire. Here, we set it to “once.” This means that Surefire will create a single forked Java process to run all your tests. Creating only one fork helps save resources and is generally faster compared to creating a new process for each test class. This way, your tests can still be run in isolation, but you avoid the overhead of excessive process creation.
- Make Use of Maven Daemon
Imagine Maven as a diligent worker, always ready to build your project. But there’s a way to make it work even faster! It’s called the Maven Daemon, a nifty tool that’s a game-changer, especially for large projects.
The Maven Daemon is like a background wizard that holds crucial project info in its memory, making subsequent builds lightning-fast. Here’s how you can get it and use it:
To make use this daemon into your java projects, you’ll find simple installation instructions in the ‘How to Install mvnd’ guide.
Once you have it installed, it’s time to let it work its magic. Instead of the regular mvn command, use mvnd when building your Maven project. It’s as simple as this:
mvnd clean install
With this command, the mvnd daemon kicks in quietly in the background, seamlessly carrying out the clean and install tasks. Your project will thank you for the boost!

Frequently Asked Questions
Why does Maven download so much stuff?
When a dependency has its own dependencies, those dependencies will also be downloaded as part of the process. This is known as a “transitive dependency.” As a result, when you use a dependency manager like Maven, it needs to download the required jars to your local hard drive, which can result in a significant amount of downloaded files.
How to clear the cache in Maven?
To remove the local Maven repository cache, you can simply delete the .m2/repository folder. This folder contains the cache of downloaded artifacts for your local projects. You can also configure the local repository path in your Maven settings.xml file, either in the global or user settings section. This will allow you to specify a custom location for the repository cache, rather than relying on the default location.
Can you use both Maven and Gradle?
Contrary to popular belief, there’s no inherent conflict between using both Maven and Gradle for the same software project. In fact, it’s perfectly fine to maintain separate build scripts for each tool, as long as they’re designed to work together harmoniously. So go ahead, enjoy the flexibility and benefits of using both Maven and Gradle for your project, and don’t worry about any potential conflicts
