
Chapter 1: Spring Boot Overview
This guide will teach you how to use the most popular Java framework, Spring Boot.
This guide will show you how to build a web app using Spring Boot from start to finish. You will also learn how to install Java Software Development Kit (SDK) and set up Spring Boot on your computer.
Also, we’ll show you how to connect a MariaDB database with Spring Boot and deploy a full-blown web application to the server in this Spring Boot guide.
Let’s get our hands dirty:
Prerequisites
Before you continue with this guide, you need to have a working knowledge of:
- Java,
- backend frameworks,
- server-side programming
These will aid your understanding of the Spring Boot framework.
What is Spring Boot?
Spring Boot is an open-source Java framework built to ease the development of Java-based web applications. It is a subset of the Spring framework and takes the convention-over-configuration approach, which allows developers to create production-ready web applications rapidly and with relative ease.
The main goal of Spring Boot is to remove boilerplate code and lengthy configurations that developers often encounter when building web applications with the Spring framework. It comes with opinionated rules and auto-configured settings, which reduces the time and effort needed to set up a Spring web application.
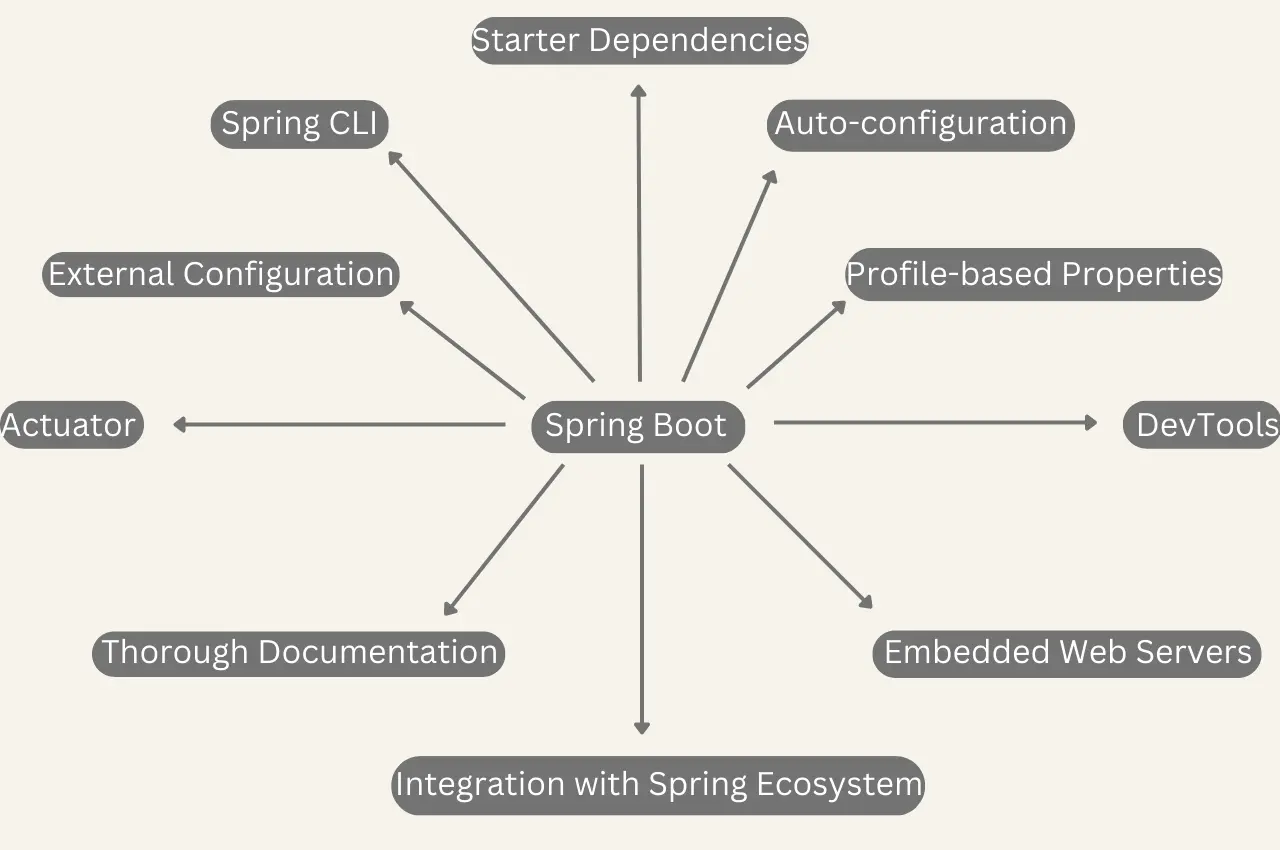
Features of Spring Boot
Spring Boot comes fitted with a lot of features that make it a popular choice for Java-based web development. Below are some of its key features:
-
Auto-configuration
Spring Boot provides automatic configuration for various components, reducing the need for explicit configuration. It analyzes the classpath and sets up default configurations, making it easy to start with minimal setup. -
Starter Dependencies
Spring Boot offers a set of starter dependencies that include common libraries for specific tasks. These starters simplify the management of dependencies and help developers focus on building features rather than worrying about configuration. -
Embedded Web Servers
Spring Boot comes with embedded web servers like Tomcat, Jetty, and Undertow, allowing developers to run applications as standalone executables without deploying them to external servers. -
Actuator
Spring Boot Actuator provides production-ready features, such as health checks, metrics, and monitoring, making managing and monitoring applications in a production environment easier. -
Spring CLI
Spring Boot Command-Line Interface (CLI) enables developers to quickly create, test, and run Spring Boot applications from the command line, enhancing productivity and rapid prototyping. -
Thorough Documentation
Spring Boot is well-documented, providing extensive reference guides, tutorials, and sample applications to help developers understand and use its features effectively. -
Integration with Spring Ecosystem
Spring Boot seamlessly integrates with the broader Spring ecosystem, allowing developers to leverage other Spring projects and libraries effortlessly. -
Profile-based Properties
Spring Boot supports profile-based properties, enabling developers to define configuration properties for specific environments (e.g., development, testing, production) and switch between them easily. -
External Configuration
Spring Boot allows developers to configure applications using external properties files (e.g.,application.yml,application.yaml,application.properties), making it convenient to modify configurations without changing the code. -
DevTools
Spring Boot DevTools provides a set of development-time features like automatic application restarts and remote debugging, enhancing the development experience.
Spring Boot vs Other Java Web Frameworks
As of the time of writing, here are the GitHub stars of Spring Boot compared to other Java web frameworks:
- Spring Boot 68.4k GitHub ⭐️
- Vert.x 13.7k GitHub ⭐️
- Quarkus 12k GitHub ⭐️
- Struts 1.2k GitHub ⭐️
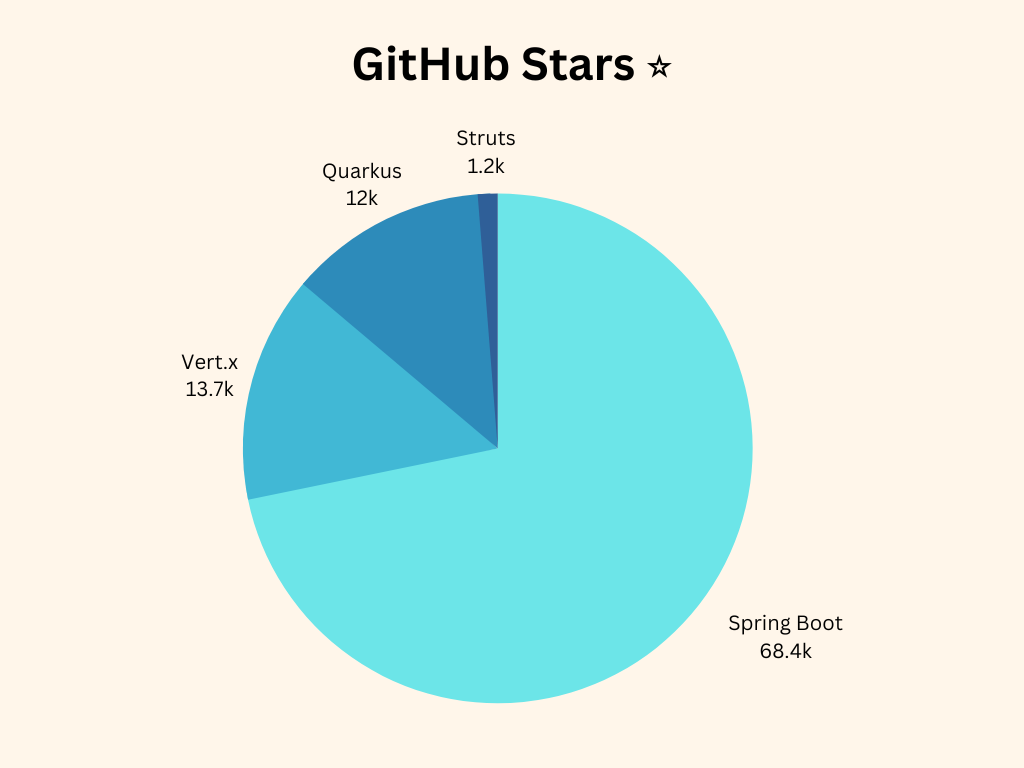
Here is what makes Spring Boot top the chart.
- Externalized, type-safe, and flexible configuration
- Loose coupling (due to dependency injection)
- Easy-to-test (due to dependency injection)
- It uses Plain Old Java Objects (POJOs)
- Extensive and comprehensive documentation
- Active, vibrant community
Now that you have a comprehensive overview of Spring Boot. Let’s dive into the spring boot framework and explore its inner workings.
Chapter 2: Spring Boot The Framework
In this chapter, this guide will delve a little into the Spring Boot framework. This chapter will capture the structure and architecture of the Spring Boot framework.
Spring Boot uses a layered architecture where each layer is stacked on top of the other and communicates hierarchically.
Now let’s dive into the main layers of Spring Boot to understand the framework’s inner workings. The layers are divided into four main categories:
- Business Layer
- Infrastructure Layer
- Presentation Layer
The business layer is the most important, as it is where your application’s logic resides. Now, let’s look at each layer and see what function they provide.
Business Layer
In Spring Boot development, the business layer refers to the part of the application responsible for handling business logic and processing data. It is an intermediary between the presentation layer (usually the controllers or endpoints) and the data access layer (usually the repositories or data access objects).
The primary purpose of the business layer is to encapsulate the application’s core business rules and operations. It ensures the application’s business logic is separate from the presentation and data access concerns, promoting a clean and maintainable codebase.
Here are the key Responsibilities of the Business Layer:
-
Business Logic
The business layer contains the implementation of business rules, calculations, validations, and other specific logic required to fulfill the application’s requirements. It should be designed in a way that is reusable, modular, and easy to test. -
Data Transformation
The business layer is responsible for transforming and processing data received from the presentation or data access layers. It prepares data in a format suitable for consumption by the presentation layer or the database. -
Transactions Management
In Spring Boot, the business layer is where you can define transactional boundaries to manage database transactions effectively. This ensures that database operations are either committed or rolled back together in case of an exception. -
Security and Authorization
The business layer can enforce security and access control rules to ensure that only authorized users can perform certain operations based on their roles and permissions. -
Error Handling
The business layer can handle exceptions and errors thrown during the execution of business logic. It may transform these exceptions into user-friendly error messages or log them for debugging. -
Dependency Injection
The business layer often utilizes dependency injection to access services or components from other layers, such as repositories or external services.
Infrastructure Layer
The infrastructure layer manages data access, external communications, and configuration. It acts as a bridge between the application’s business logic and the underlying system resources. The infrastructure layer primarily focuses on enabling the application to interact with databases, external services, messaging systems, and other technical components.
Key components of the infrastructure layer in Spring Boot include:
-
Data Access
The infrastructure layer handles data access and persistence through repositories, data access objects (DAOs), and database connectors. Spring Boot supports various data sources and ORM frameworks, simplifying database interaction. -
External Communications
This layer manages communication with external services, APIs, and web services. It uses REST clients, HTTP libraries, and messaging frameworks to interact with external systems. -
Configuration Management
Infrastructure layer manages the application’s configuration settings, such as properties files, environment variables, and configuration classes. Spring Boot’s auto-configuration feature allows developers to set up application configurations easily without explicit coding. -
Caching
Caching is a crucial aspect of infrastructure that improves application performance by storing frequently accessed data in memory. Spring Boot supports various caching mechanisms, making implementing caching in the application easier. -
Security
Infrastructure layer handles application security, including authentication, authorization, and user management. Spring Boot offers robust security features and integrates seamlessly with Spring Security to ensure application security. -
Logging and Monitoring
Logging and monitoring components are part of the infrastructure layer to provide insights into the application’s behavior and performance. Spring Boot Actuator is a valuable tool that offers production-ready features like health checks, metrics, and monitoring. -
Error Handling
Infrastructure manages error handling and exception management in the application. It ensures that errors are gracefully handled, and appropriate responses are provided to users or logged for debugging purposes.
Presentation Layer
Spring Boot’s presentation layer handles the user interface and user interactions. It is the topmost layer of the application. It is primarily concerned with how data is presented to users and how their inputs are processed and passed to the underlying business logic.
The presentation layer in a Spring Boot typically consists of the following components:
-
Controllers
Controllers are responsible for handling incoming HTTP requests from clients (such as web browsers, mobile apps, or other APIs). They receive the requests, process any data the client sends, and invoke the appropriate business logic to handle the request. Controllers then return the response to the client in the desired format, such as JSON, XML, or HTML. -
Views (optional)
In traditional server-side rendering web applications, views are responsible for generating the HTML that is sent to the client’s web browser. However, in modern API development, views are often not used since APIs primarily serve as backends for frontend applications or mobile apps, and the presentation is usually handled on the client side. -
DTOs (Data Transfer Objects)
DTOs are objects used to transfer data between the presentation layer and the other layers of the application. They help decouple the data sent to and received from the client from the internal data structures used within the application. -
Exception Handling
The presentation layer handles exceptions that may occur during request processing and provides appropriate error responses to the client. -
Security
The presentation layer may also include security-related components, such as authentication and authorization filters, to ensure that only authorized users can access certain endpoints or perform specific actions.
Understanding the internal structures and architecture of Spring Boot is vital to know how you can use Spring Boot to the fullest. Now that we have seen the hierarchical architecture of Spring Boot. Let’s go deep into the workflow of the framework.
Now that we understand the inner workings of the Spring Boot Framework, let’s start building our first project following the structure from this tutorial:
CHAPTER 3: A Web Application with Spring Boot
Here are the steps you should take to create a Spring Boot web API
Set Up Your Development Environment
Before you begin, make sure you have the following installed on your system:
- JDK (Java Development Kit) 20 or later
- Any IDE of your choice (e.g., IntelliJ IDEA, Visual Studio Code, Spring Tool Suite 4, Eclipse)
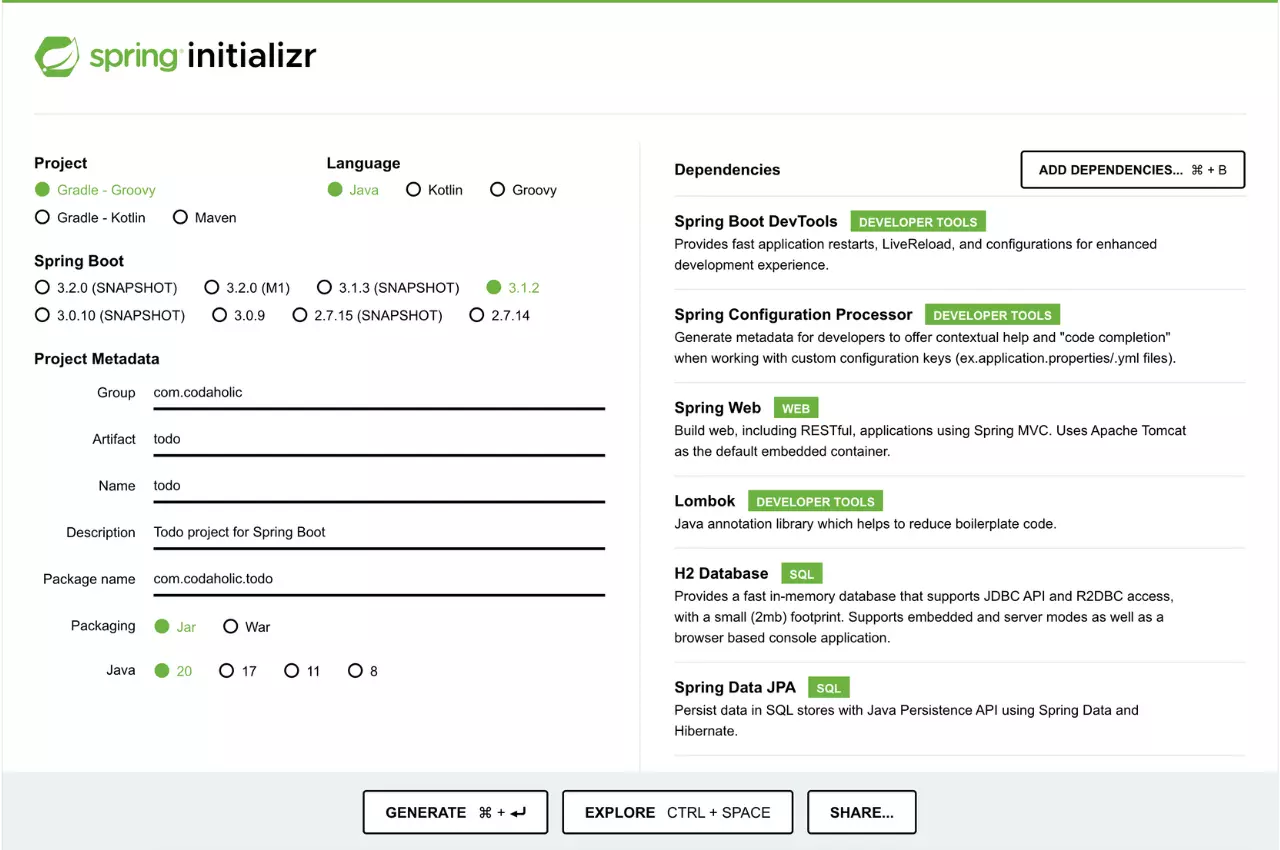
Generate a Spring Boot Project with Spring Initializr
To get started, we will use a web-based tool called Spring Initializr; this tool will help us quickly bootstrap Spring Boot projects. Below are the steps to take to generate one quickly:
- Open your browser and enter this link https://start.spring.io/ .
- Select the following options:
- Project:
Gradle Project - Language:
Java - Spring Boot:
3.1.0 - Group:
com.codaholic(replace with your desired package name) - Artifact:
blog(replace with your desired project name) - Packaging: Jar
- Java:
20
- Project:
- select the following dependencies:
- Spring Web
- Lombok
- H2 Database
- Spring Boot Data JPA
- Spring Boot DevTools
- Spring Boot Configuration Processor
- Next, Click on
Generateto download the project as a ZIP file.
Import the Project into Your IDE
- Unzip the downloaded ZIP file to a directory of your choice.
- Open your IDE and import the project as a Gradle project. If you are using IntelliJ IDEA, go to File -> New -> Project from Existing Sources and select the project’s directory. Follow the instructions to complete the import process.
- Update build.gradle: Open up
build.gradleand ensure thatsourceCompatibilityandtargetCompatibilityare20
java {
	sourceCompatibility = '20'
	targetCompatibility = '20'
	project.buildDir = 'target'
}
Create A Base Entity
- Open the generated project in your IDE.
- Create a package called
domainsrc/main/java/com/codaholic/todo/domain - Create a package called
commonsrc/main/java/com/codaholic/todo/domain/common - Create a new java class in the
commonpackage and name itBaseEntity.java, and add the following piece of code
package com.codaholic.todo.domain.common;

import com.fasterxml.jackson.annotation.JsonIgnore;
import jakarta.persistence.*;
import lombok.Data;
import org.springframework.data.annotation.CreatedDate;
import org.springframework.data.annotation.LastModifiedDate;

import java.io.Serial;
import java.io.Serializable;
import java.time.LocalDateTime;
import java.util.UUID;


@Data
@MappedSuperclass
public abstract class BaseEntity implements Serializable {
    @Serial
    private static final long serialVersionUID = 5L;

    @Id
    @GeneratedValue
    private UUID id;

    @JsonIgnore
    @CreatedDate
    @Column(name = "created_dt")
    @Temporal(TemporalType.TIMESTAMP)
    private LocalDateTime createdDate;

    @JsonIgnore
    @LastModifiedDate
    @Column(name = "updated_dt")
    @Temporal(TemporalType.TIMESTAMP)
    private LocalDateTime updatedDate;

    @JsonIgnore
    @Version
    private Integer version;
}
Let’s break down what each part of the code does:
-
@Data: This annotation is from Lombok, and automatically generates getter and setter methods for the fields, as well as a toString() method and equals() and hashCode() methods. -
@MappedSuperclass: This annotation marks the class as a mapped superclass, which means it provides common properties to other entity classes but will not be mapped to a database table itself. -
@Serial: This annotation declares the field “serialVersionUID” as the version identifier for serializing and deserializing objects. -
private UUID id;: This field represents the unique identifier (ID) of the entity. The “@Id” annotation marks this field as the primary key for the entity. -
@JsonIgnore: This annotation indicates that the “createdDate” field should be ignored during JSON serialization and deserialization. -
@CreatedDate: This annotation automatically sets the “createdDate” field with the current date and time when the entity is persisted. -
@Column(name = "created_dt"): This annotation specifies the name of the database column where the “createdDate” field will be stored. -
@Temporal(TemporalType.TIMESTAMP): This annotation specifies the type of the “createdDate” field, which is TIMESTAMP. -
private LocalDateTime updatedDate;: This field represents the last modified date of the entity. The “@LastModifiedDate” annotation automatically updates this field with the current date and time when the entity is updated. -
@Column(name = "updated_dt"): This annotation specifies the name of the database column where the “updatedDate” field will be stored. -
@Version: This annotation marks the field as a version field for optimistic locking. It is used to handle concurrent updates to the same entity.
Create A Todo Entity
- Create a package called
entitiessrc/main/java/com/codaholic/todo/domain/entities - Create a new java class in the
entitiespackage and name itTodo.java, and add the following piece of code
package com.codaholic.todo.domain.entities;

import com.codaholic.todo.domain.common.BaseEntity;
import com.codaholic.todo.domain.enums.Status;
import jakarta.persistence.*;
import jakarta.validation.constraints.NotEmpty;
import jakarta.validation.constraints.NotNull;
import lombok.*;

import java.time.LocalDateTime;

@Data
@Entity
@Builder
@NoArgsConstructor
@AllArgsConstructor
@Table(name = "todo")
@EqualsAndHashCode(callSuper = false)
public class Todo extends BaseEntity {
    @NotEmpty(message = "Name cannot be blank")
    private String Name;

    @NotNull(message = "Start Time cannot be blank")
    private LocalDateTime StartTime;

    @NotNull(message = "End Time cannot be blank")
    private LocalDateTime EndTime;

    @Builder.Default
    @Enumerated(EnumType.STRING)
    private Status TaskStatus = Status.PENDING;
}
Here is a brief explanation of what this piece of code does:
-
@Data,@Entity,@Builder,@NoArgsConstructor,@AllArgsConstructor,@Table(name = "todo"),@EqualsAndHashCode(callSuper = false)
These are annotations that provide additional information and behavior to the class. -
private String Name;
This line declares a private field named “Name” of type “String”. It represents the name of a task in a to-do list. -
private LocalDateTime StartTime;
This line declares a private field named “StartTime” of type “LocalDateTime”. It represents the date and time when the task should start. -
private LocalDateTime EndTime;
This line declares a private field named “EndTime” of type “LocalDateTime”. It represents the date and time when the task should end.private Status TaskStatus = Status.PENDING;
This line declares a private field named “TaskStatus” of type “Status” (which is an enumerated type). It represents the task’s status, and its default value is set toPENDING. -
@NotEmpty(message = "Name cannot be blank"),@NotNull(message = "Start Time cannot be blank"),@NotNull(message = "End Time cannot be blank")
These are validation annotations that specify constraints on the fields. For example, the “Name” field must not be empty, and the “StartTime” and “EndTime” fields must not be null.
Create an Enum, Status
- Create a package called
enumssrc/main/java/com/codaholic/todo/domain/enums - In the package above, create Status enum
Status.java, and add the following piece of code
package com.codaholic.todo.domain.enums;

import com.fasterxml.jackson.annotation.JsonFormat;

@JsonFormat(shape = JsonFormat.Shape.STRING)
public enum Status {
    PENDING,
    COMPLETED,
    CANCELED
}
Create A TodoRepository
- Create a package called
infrastructuresrc/main/java/com/codaholic/todo/infrastructure - Create a package called
repositorysrc/main/java/com/codaholic/todo/infrastructure/repository - Create a new java class in the
repositorypackage and name itTodoRepository.java, and add the following piece of code
package com.codaholic.todo.infrastructure.repository;

import com.codaholic.todo.domain.entities.Todo;
import org.springframework.data.jpa.repository.JpaRepository;

import java.util.UUID;

public interface TodoRepository extends JpaRepository<Todo, UUID> {
}
Let’s break down what each part of the code does:
-
package com.codaholic.todo.infrastructure.repository;
This line specifies the package to which the interface belongs. Packages are used to organize related classes and help avoid naming conflicts. -
import com.codaholic.todo.domain.entities.Todo;
This line imports theTodoclass from the “com.codaholic.todo.domain.entities” package. The “Todo” class represents a task in a to-do list. -
import org.springframework.data.jpa.repository.JpaRepository;
This line imports theJpaRepositoryinterface provided by Spring Data JPA. JpaRepository is a built-in Spring interface that provides basic CRUD (Create, Read, Update, Delete) operations for a JPA entity. -
import java.util.UUID;
This line imports theUUIDclass from the Java standard library.UUIDis used to represent universally unique identifiers. -
public interface TodoRepository extends JpaRepository<Todo, UUID>
This line declares theTodoRepositoryinterface, which extends theJpaRepositoryinterface. It specifies that this repository will be used to manage instances of theTodoclass, and the primary key of theTodoclass is of typeUUID.
Create A TodoService
- Create a package called
servicessrc/main/java/com/codaholic/todo/infrastructure/services - Create a new java class in the
servicespackage and name itTodoService.java, and add the following piece of code
package com.codaholic.todo.infrastructure.services;

import com.codaholic.todo.domain.entities.Todo;
import com.codaholic.todo.infrastructure.repository.TodoRepository;
import org.springframework.stereotype.Service;

import java.util.List;
import java.util.UUID;

@Service
public class TodoService {
    private final TodoRepository repo;

    TodoService(TodoRepository repo){
        this.repo = repo;
    }


    public List<Todo> getAllTodos() {
        return repo.findAll();
    }

    public Todo createTodo(Todo todo) {
        return repo.save(todo);
    }

    public Todo getTodoById(UUID id) {
        return repo.findById(id)
                .orElseThrow(() -> new IllegalArgumentException("Todo not found"));
    }

    public Todo updateTodo(UUID id, Todo todoDetail) {
        Todo todo = repo.findById(id)
                .orElseThrow(() -> new IllegalArgumentException("Todo not found"));

        todo.setName(todoDetail.getName());
        todo.setStartTime(todoDetail.getStartTime());
        todo.setEndTime(todoDetail.getEndTime());
        todo.setTaskStatus(todoDetail.getTaskStatus());

        return repo.save(todo);
    }

    public void deleteTodo(UUID id) {
        repo.deleteById(id);
    }
}
Let’s break down what each part of the code does:
-
@Service
This annotation marks the “TodoService” class as a Spring service. -
getAllTodos()
This method retrieves all to-do items from the database using thefindAll()method provided by theTodoRepository -
createTodo(Todo todo)
This method saves a new to-do item to the database using thesave()method provided by theTodoRepository -
getTodoById(UUID id)
This method retrieves a specific to-do item from the database by its unique identifier (UUID) using the “findById()” method provided by theTodoRepository. If the to-do item with the specified ID is not found, it throws an exception. -
updateTodo(UUID id, Todo todoDetail)
This method updates an existing to-do item in the database. It first retrieves the to-do item with the given ID from the database using thefindById()method. If the to-do item is found, it updates its properties with the values from thetodoDetailparameter and saves the changes to the database using thesave()method provided by theTodoRepository -
deleteTodo(UUID id)
This method deletes a to-do item from the database using thedeleteById()method provided by theTodoRepository
Create A TodoController
- Create a
webapipackagesrc/main/java/com/codaholic/todo/webapi - Create
controllerspackagesrc/main/java/com/codaholic/todo/webapi/controllers - in the
controllerspackage, addTodoController.java, and add the following piece of code
package com.codaholic.todo.webapi.controllers;

import com.codaholic.todo.domain.entities.Todo;
import com.codaholic.todo.infrastructure.services.TodoService;
import org.springframework.beans.factory.annotation.Autowired;
import org.springframework.http.HttpStatus;
import org.springframework.http.ResponseEntity;
import org.springframework.web.bind.annotation.*;

import java.util.List;
import java.util.UUID;

@RestController
@RequestMapping("/api/todo")
public class TodoController {
    private final TodoService todoService;

    @Autowired
    public TodoController(TodoService todoService) {
        this.todoService = todoService;
    }

    @GetMapping
    public ResponseEntity<List<Todo>> getAllTodos() {
        List<Todo> todos = todoService.getAllTodos();
        return ResponseEntity.ok(todos);
    }

    @PostMapping
    public ResponseEntity<Todo> createTodo(@RequestBody Todo todo) {
        Todo createdTodo = todoService.createTodo(todo);
        return ResponseEntity.status(HttpStatus.CREATED).body(createdTodo);
    }

    @GetMapping("/{id}")
    public ResponseEntity<Todo> getTodoById(@PathVariable UUID id) {
        Todo product = todoService.getTodoById(id);
        return ResponseEntity.ok(product);
    }

    @PutMapping("/{id}")
    public ResponseEntity<Todo> updateTodo(@PathVariable UUID id, @RequestBody Todo todoDetails) {
        Todo updatedTodo = todoService.updateTodo(id, todoDetails);
        return ResponseEntity.ok(updatedTodo);
    }

    @DeleteMapping("/{id}")
    public ResponseEntity<Void> deleteProduct(@PathVariable UUID id) {
        todoService.deleteTodo(id);
        return ResponseEntity.noContent().build();
    }
}
Let’s break down what each part of the code does:
-
@RestController: This annotation is used to indicate that this class is a Spring RESTful controller. It combines the functionality of “@Controller” and “@ResponseBody” annotations. -
@RequestMapping("/api/todo"): This annotation maps the controller to the “/api/todo” URL path. All endpoints in this controller will be relative to this path. -
@Autowired: This annotation marks the constructor as a place where the “TodoService” instance should be automatically injected. -
@GetMapping: This annotation is used to handle HTTP GET requests. In this case, it maps the method to the “/api/todo” URL path, so it will handle GET requests to “/api/todo”. -
@GetMapping("/{id}"): This annotation is used to handle HTTP GET requests with a dynamic path variable “{id}”. In this case, it maps the method to the “/api/todo/{id}” URL path, so it will handle GET requests to “/api/todo/{id}”. -
@PostMapping: This annotation is used to handle HTTP POST requests. In this case, it maps the method to the “/api/todo” URL path, so it will handle POST requests to “/api/todo”. -
@PutMapping("/{id}"): This annotation is used to handle HTTP PUT requests with a dynamic path variable “{id}”. In this case, it maps the method to the “/api/todo/{id}” URL path so that it will handle PUT requests to “/api/todo/{id}”. -
@DeleteMapping("/{id}"): This annotation is used to handle HTTP DELETE requests with a dynamic path variable “{id}”. In this case, it maps the method to the “/api/todo/{id}” URL path so that it will handle DELETE requests to “/api/todo/{id}”. -
getAllTodos(): This method handles the HTTP GET request to “/api/todo”. It calls thegetAllTodos()method from theTodoServiceto retrieve a list of all Todo items. The list is then wrapped in aResponseEntityand returned with a 200 OK status code. -
createTodo(@RequestBody Todo todo): This method handles the HTTP POST request to “/api/todo”. It expects a JSON representation of a Todo item in the request body. The method calls thecreateTodo()method from theTodoServiceto create a new Todo item using the provided data. The newly created Todo item is then wrapped in aResponseEntityand returned with a 201 CREATED status code. -
getTodoById(@PathVariable UUID id): This method handles the HTTP GET request to “/api/todo/{id}”, where “{id}” is a path variable representing the ID of the Todo item to retrieve. The method calls thegetTodoById()method from theTodoServiceto fetch the Todo item with the specified ID. The Todo item is then wrapped in aResponseEntityand returned with a 200 OK status code. -
updateTodo(@PathVariable UUID id, @RequestBody Todo todoDetails): This method handles the HTTP PUT request to “/api/todo/{id}”, where “{id}” is a path variable representing the ID of the Todo item to update. The method expects a JSON representation of the updated Todo item in the request body. It calls theupdateTodo()method from theTodoServiceto update the Todo item with the provided ID and details. The updated Todo item is then wrapped in aResponseEntityand returned with a 200 OK status code. -
deleteProduct(@PathVariable UUID id): This method handles the HTTP DELETE request to “/api/todo/{id}”, where “{id}” is a path variable representing the ID of the Todo item to delete. The method calls thedeleteTodo()method from theTodoServiceto delete the Todo item with the specified ID. It returns aResponseEntitywith a 204 NO CONTENT status code, indicating that the deletion was successful, but there is no response body.
Set up the H2 Database
At this level, we will use an in-memory database. Below is the configuration to set up the database.
- Rename
src/main/resources/application.propertiestosrc/main/resources/application.yml - Next, add the below YAML configuration to
src/main/resources/application.yml
spring:
  main:
    banner-mode: off
  output:
    ansi:
      enabled: always
  h2:
    console:
      enabled: true
  datasource:
    url: jdbc:h2:mem:testdb
    driverClassName: org.h2.Driver
  jpa:
    database-platform: org.hibernate.dialect.H2Dialect
    open-in-view: false
    show-sql: true
    hibernate:
      ddl-auto: create-drop

server:
  address: ${APP_ADDRESS}
  port: ${APP_PORT}
  compression:
    enabled: true
  error:
    include-message: always
  shutdown: "graceful"

logging:
  level:
    root: WARN
    org.springframework.web: DEBUG
    org.hibernate: ERROR
  file:
    name: logs/todo.log
Setup Environmental Variables
In the root directory of your project, create a file and save it as .env.dev, and add the following environmental variables as shown below
export APP_PORT=3000
export APP_ADDRESS=127.0.0.1
The commands above set two environment variables: APP_PORT and APP_ADDRESS. Let’s break down each line:
-
export APP_PORT=3000: This command sets the environment variableAPP_PORTto the value3000.APP_PORTis the port number on which our Spring Boot application will listen for incoming requests. -
export APP_ADDRESS=127.0.0.1: This command sets the environment variableAPP_ADDRESSto the value127.0.0.1. The IP address127.0.0.1is a special loopback address that points to the current machine. In other words, it represents the local host or the “localhost.”
Build and Run the Application
- Open a terminal or command prompt.
- Navigate to the project’s root directory.
- Run the following command to build the project:
source .env.dev && ./gradlew bootRun
The Spring Boot application will start, and you will see log messages showing the server is up and running.
Let’s test our Spring Boot Web API
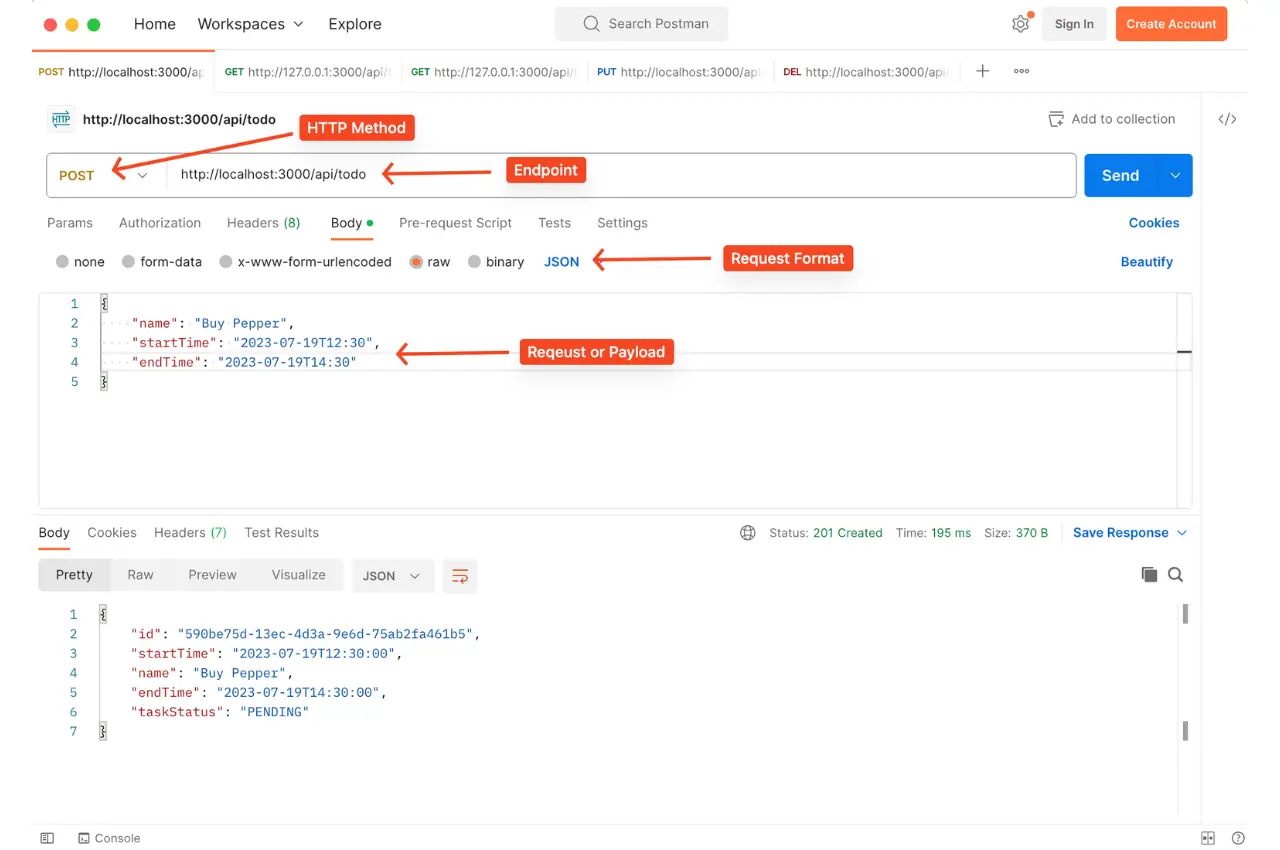
To test our API, we need to download and install a REST Client called Postman. A REST Client is an application that API developers use to test their Web APIs.
NB: You can use any REST Client of your choice; it must not be Postman
First, we need to create a resource and add a product to our database. To do that, we need to make a POST request to this endpoint http://localhost:3000/api/todo in JSON format, as shown in the image below.
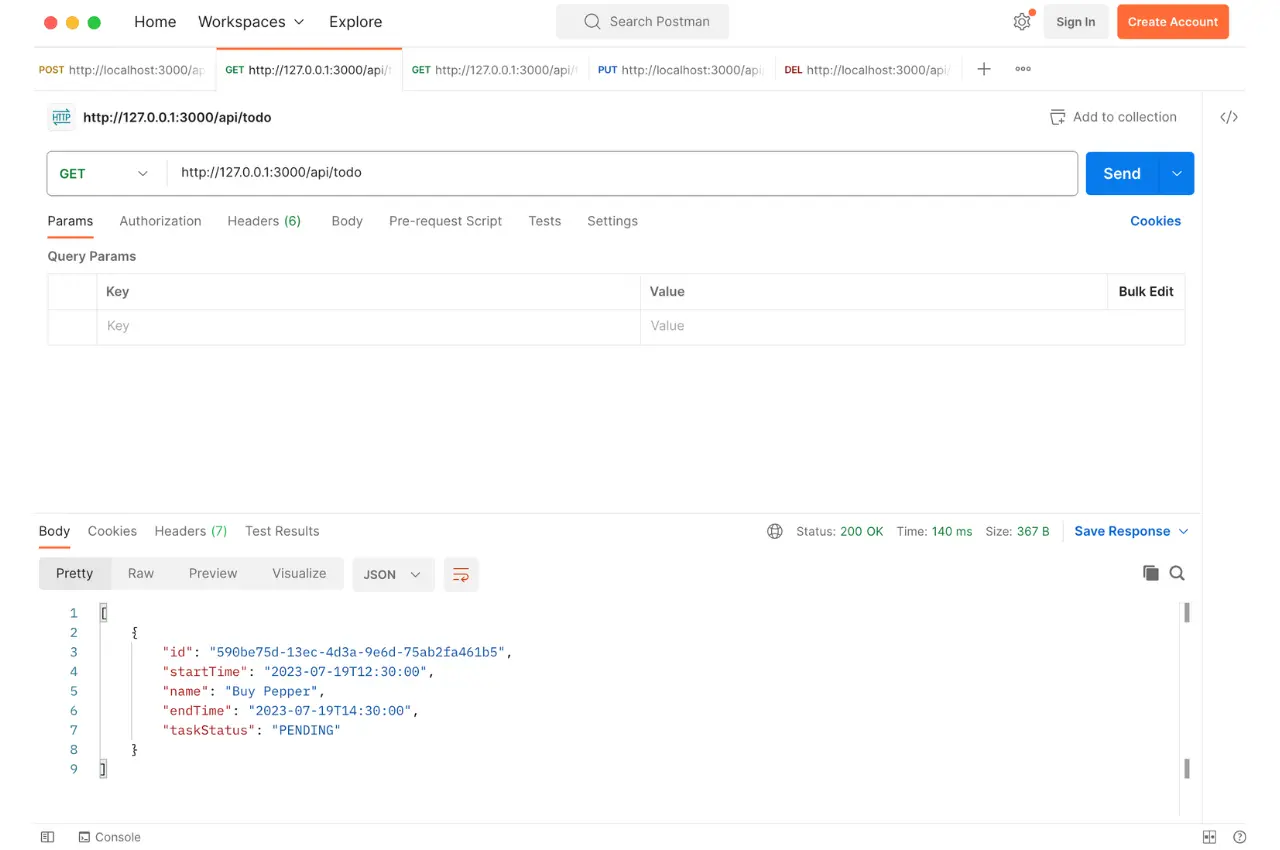
To Fetch all the products that have been added or created, send a GET request to http://localhost:3000/api/todo, as shown in the image below.
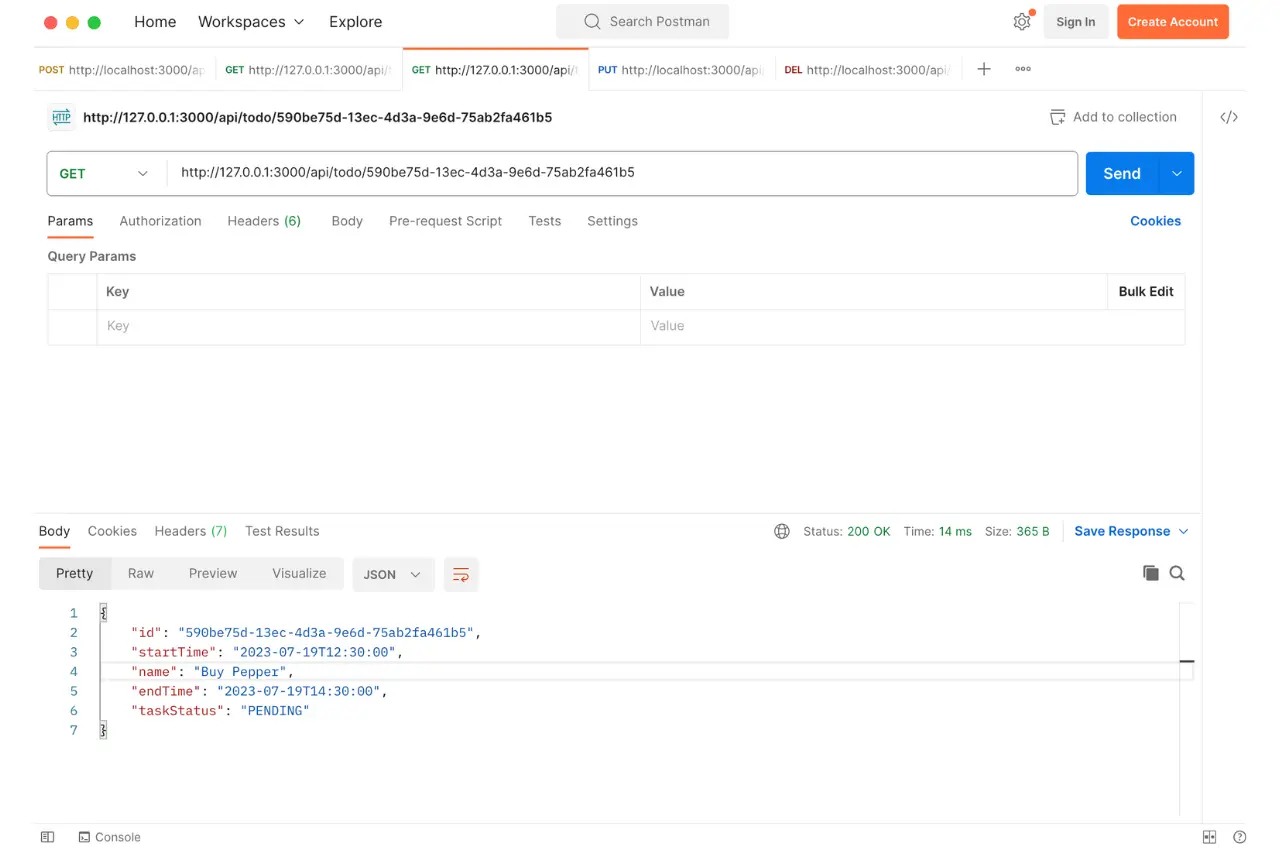
To Fetch just one product or a particular product, send a GET request with the specific ID to http://localhost:3000/api/todo/590be75d-13ec-4d3a-9e6d-75ab2fa461b5, as shown in the image below.
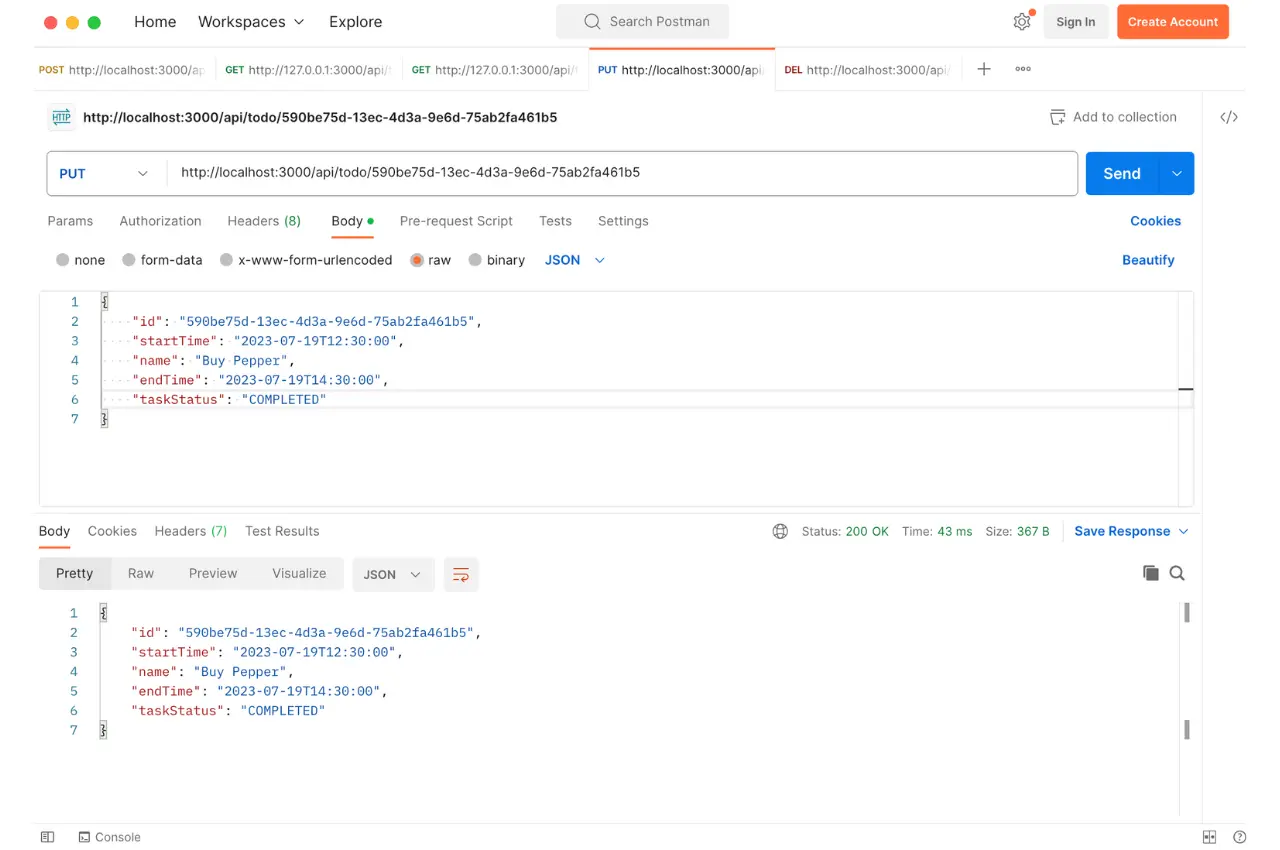
To update any product, send a PUT request with the specific ID to http://localhost:3000/api/todo/590be75d-13ec-4d3a-9e6d-75ab2fa461b5, as shown in the image below.
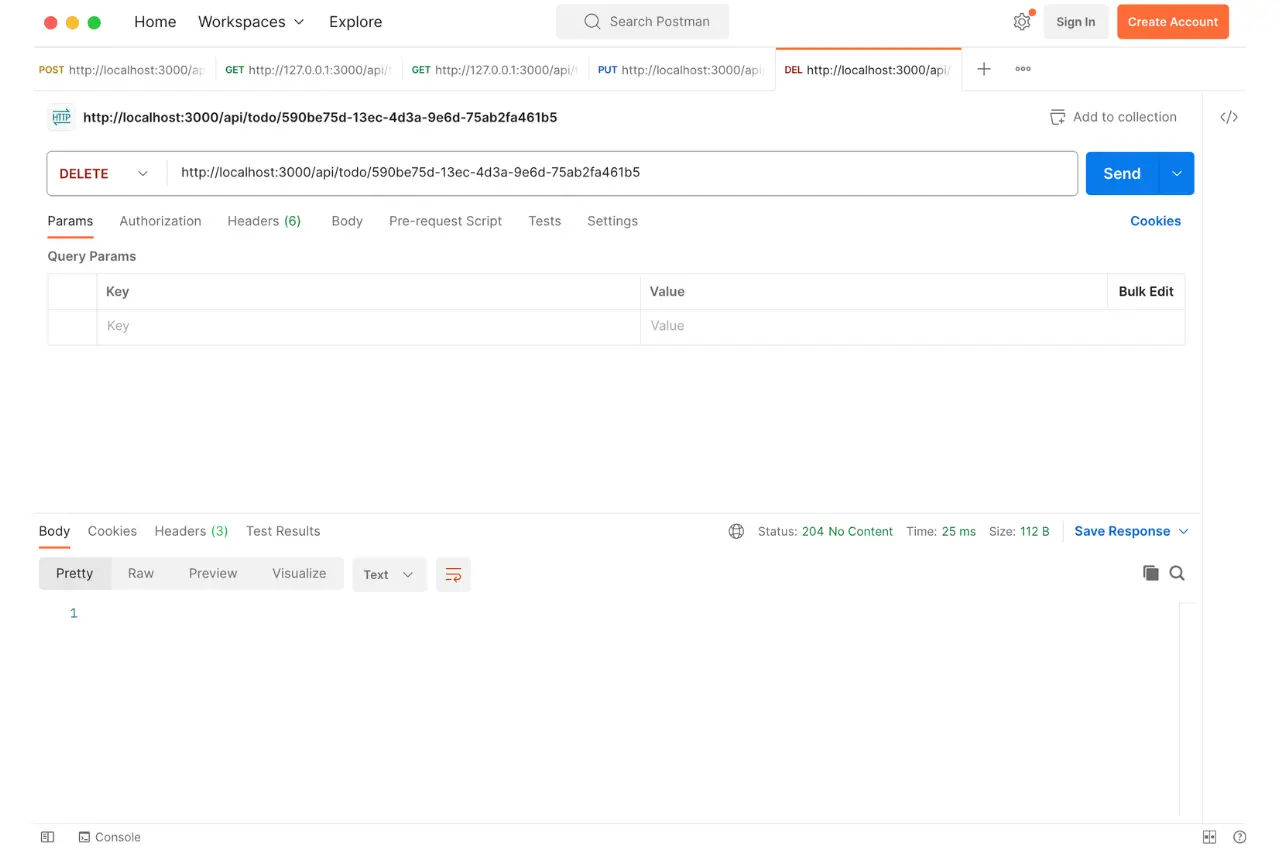
To delete a product, send a DELETE request with the specific ID to http://localhost:3000/api/todo/590be75d-13ec-4d3a-9e6d-75ab2fa461b5 as shown in the image below
Congratulations! We have created and ensured that our Spring Boot Web API works as intended.
The source code for this guide can be found on Codaholic

Frequently Asked Questions
Is Spring Boot easy for beginners?
Spring Boot is designed to be accessible and user-friendly, making it an ideal choice for developers with prior experience in Java programming and web development. Its streamlined architecture and intuitive interface enable users to quickly familiarize themselves with the framework and begin building applications efficiently.
Is Spring Boot faster than Spring?
Spring Boot streamlines the application development process by integrating all the features of the standard Spring framework, making it much quicker to launch an application. Compared to Spring, Spring Boot significantly reduces the time it takes to get an application up and running because it automatically configures all its attributes. Therefore, the answer is Spring Boot.
How do I reduce build time in Spring Boot?
To optimize the performance of a Spring Boot application, consider implementing the following best practices:
- Reduce dependencies
- Use Lazy initialization
- Garbage collection tuning
- Use Spring Boot’s Actuator
- Minimize auto-configuration
- Use the latest version of the JVM
- Make use of profile-specific configuration
- Use classpath scanning to discover and configure beans at runtime dynamically